A week in the woods
Summary
From the 9th to the 15th May 2004, I went on the Fundamental Bushcraft course with the Ray Mears School of Bushcraft, in the Kent countryside. Here’s what happened:
Day 1 – Sunday
We arrive in the early afternoon. 15 students, ranging from 25 to 65 years old, from a range of backgrounds. We are collected from a tea house car park and driven by 4×4 into the woods to the camp.
The camp is in or near Eridge Park near Tunbridge Wells. There are Six instructors / helpers, including one women. They are mostly graduates from this school, including the trainee instructor. Lead instructor is Juha Rankinen, a Swedish instructor with over 20 years experience, and best mates with Ray Mears.
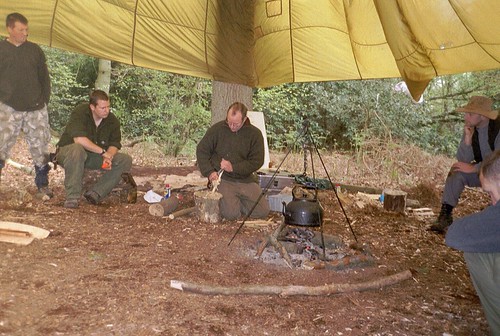
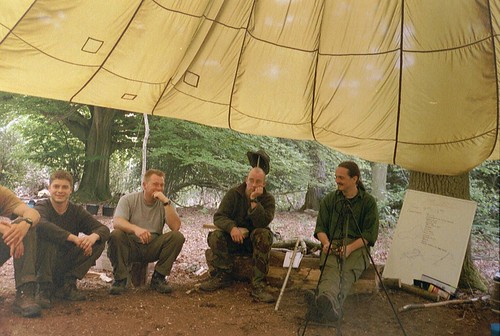
The camp has a main area with a fire that they never allow to go out. A parachute hangs over the fire, there are logs to sit on and a brew box. There is a separate instructors area, a latrine off in the woods, and a cooking area (pasta, soup and bread for dinner, cereal with powdered milk or tinned fruit for breakfast).

We are taken on a camp tour, told there will be an exam at the end, and not much else. We have dinner the introduce ourselves and say what we hope to get from the course. I particularly want to learn about wild foods. We are offered a welcome beer, then head a little deeper in the woods to each setup our own bivouac area.
Day 2
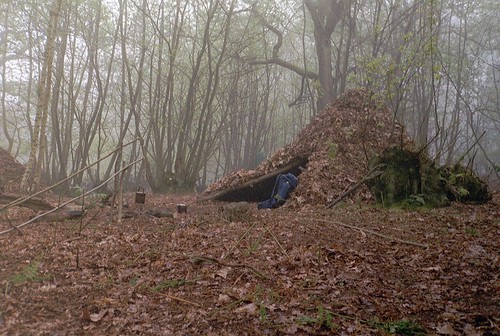
The knife is your most important tool. Then it is the saw, then the axe. We are loaned a folding saw and told to build a two-man shelter.
You need a forked stick about neck height and two long straight sticks which lean on the forked stick to form a structure. Then lean sticks all around the sides and back and a bit down the front.
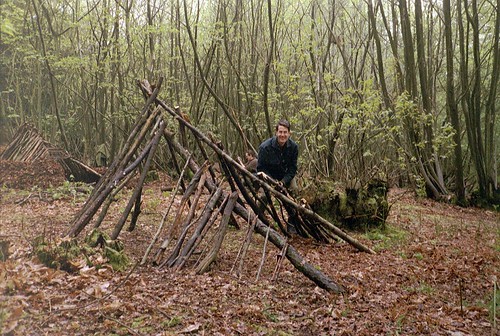
Finally collect big packs of fallen leaves and, starting at the bottom and working up, lay them as if they were tiles or bricks. Pack them round to about hand-to-elbow deep. Make sure no sticks stick out, or water will run down the sticks into your home. Saw off any bits sticking out and cover with leaves.
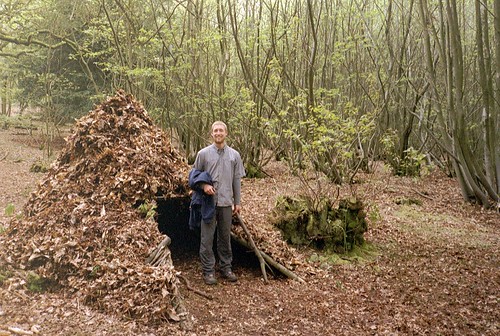
It takes us about four hours to make the shelter. The leaf stacking is the most time consuming. An experienced team can do it in about two hours apparently.
Sandwiches for lunch.
We are loaned a hoochie, a billy can, and a bivvy bag.
In the afternoon we are each given a knife. Your knife is your life. Knives should have a single bevel – it makes them easier to sharpen, and be ‘full tang’, meaning the metal of the blade goes all the way to the back of the handle.
The sharpen a knife using a sharpening stone: Put stone on flat surface. Lay blade facing away. Tilt onto bevel. Fingers along edge for pressure. Push away and draw blade across stone. Small angle as tip on stone to keep pressure. Aim for a razor edge. Flip knife over and using pressure from thumbs do the other side. When you look down onto the blade (from underneath the knife in normal operation) you should not see any white reflections – they mean a flat surface. Then ‘strop’ the knife. Tie a leather belt onto something (tree branch) and rub the edge of the blade onto it to take the razor edge off.
We walk off to a special are of the woods to collect Alder, to make a bow drill. Alder grows in clumps in wet, boggy terrain. We look for a dead standing tree. Slice the bark – the outer bark should be reddish. Push with fingernail. If you make a dent it’s good wood. Kiss it. Warmish and dry is good. Fell the dead tree by cutting 1/3 of the way through on the side you want it to fall, then the rest of the way through on the other side, and push it over. We then set off in search of Hazel. We need Hazel to make a pot holder called a Wogan stick. We make a pot holder, then have dinner (Turkey Korma and rice, then cake).
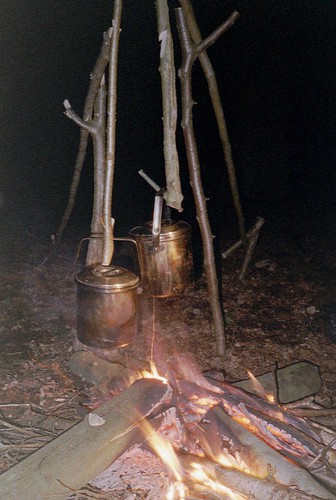
After dinner, we are taught to make fire. Clear the area and make a little platform out of sticks on the ground to keep the fire off the damp floor and allow air to pass around it. We will be using flint and steel. Striking the steel on the flint produces a spark. Most of bushcraft fire making starts with a spark – it you’re used to make fire straight from a flame (match or lighter), you’ve had it easy !.
To catch the spark we need first stage tinder. This can be anything that will light from a spark, such as very dry grass. In a temperate forest, where we were, the following make great choices: A Scottish mushroom called Horses Hoof, or Amadou. Or char cloth.
To make char cloth, put 100% cotton or silk cloth in a billy can. Make a hole in the billy can. Put the can in the fire. When smoke stops coming out of the hole take it out of the fire, check it, and leave in the can. Cloth should look ‘charcoally’. Or you can simply leave the cloth by the edge of the fire and put it out every time it catches fire. With our flint and steel we are going to use char cloth.
Once your first stage tinder (char cloth in our case) has caught the spark, you need second stage tinder. Dry bracken, shredded inner bark of sweet chestnut, or dry grass are all good choices. Crumple it up to increase the surface area. Then you need very small twigs. Birch twigs are ideal because they contain an oil that burns well, even when they are a bit damp. Then you need bigger and bigger twigs. You need all this before you strike your flint on your steel.
Fold the second stage tinder into a birds nest shape. Lay the char cloth on the flint. Strike the steel through the cloth until an ember catches on the cloth. Blow on it. Fold the cloth over and fold into the birds nest of tinder. Hold it in your hands and stand up – there is less moisture further from the ground. Blow on it some more. When breathing in move the nest up and down to increase air flow. Blow until the whole bundle erupts into flames. Put it down on your platform of twigs and put the birch twigs on top to get them to ignite. Fire ! Make as small a fire as possible using the least amount of fuel you need. Remember to dry out some first and second stage tinder, and some twigs, for use tomorrow morning.
Day 3
It comes as somewhat of a relief that the topic is Hygiene. We don’t have to pretend to be cavemen anymore. Wash feet in the evening, put on dry socks and dry the ones you were wearing. Wool socks don’t smell like cotton ones do. The main instructor, Juha, wears sealskinz gore-tex socks. Heat water and use cloth to wash body. A big handful of birch leaves, 2-3 horse chestnut leaves, or soapwort contain enough saponin to act as a good soap. Keep your toenails trimmed – the health of your feet is very important in bushcraft.
Next we learn more about bow drill fire making. Different woods and how hard they are to use for bow-drill making:
- Very easy: Ivy, Lime.
- Easy: Adler, Elder, Clematis.
- Medium: Aspen, Willow, Sycamore, Rose, Poplar, Birch (although birch is often too rotten).
- Hard: Elm, Hazel, Pine, Spruce, Juniper, Ash, Oak.
- Very hard: Apple.
Generally the harder the wood the more difficult it is to use to make fire with a bow drill. The wood has to be dead standing wood, otherwise it will be too moist. The dryer the wood the easier it will be. Knots make wood harder so make sure there are no knots on your drill end or where it meets the main plank. A friend told me after the course that he kept his bow-drill set indoors overnight so that the central heating dried it out. The next day it was much easier to use.
Then we make a wooden spoon. In Bushcraft, there is some kind of mystique associated with carving wooden spoons. Given that anything you can eat with a spoon you can probably drink (or at least slurp), the emphasis on spoon carving isn’t exactly rational. It does however teach good knife technique.
Find a piece of wood the width of which you can wrap you hand 3/4 of the way around, and which has a small curve in it. Split down the middle and work with the bottom half (it’s easier than the top half). Draw a spoon (using charcoal) onto the wood and carve it out so you have something that looks like a spoon from the top. Do the same for the side profile. Make it thicker in one profile if you went too thin in the other. Finally carve out the bowl using a crook knife. Mind your thumb !
Next it’s onto rope making. You can make rope from nettles (if you dry them first the rope will last longer) or the inner bark of the sweet chestnut tree, taken from a living tree. Scrape off the outer bark with the back of your knife. Cut a long section and peel off the inner bark. The longer the section the longer the strands you have for weaving, which makes it much easier. The same inner bark, but dead and dry, makes good tinder. Roll up and bash the bark to separate the strings, then dry it.
On to feather sticks. Split a log into very thin kindling size sticks. Remove the bark and any moist outer wood. Using the knife bevel scrape curls of wood down the length of the stick. You want the curls to be as thing as possible. Lay four sticks across each other and put a match underneath. In a wet forest the inside of dead standing wood will still be dry, so can be used for making feather sticks if you have no other dry wood.
The instructors give us some food. We make fire with our feather sticks, cook our food using our wogan stick, and sleep in our shelter. Perfect !
Day 4
The morning starts with more bow drill practice. Making fire with a bow drill is difficult !
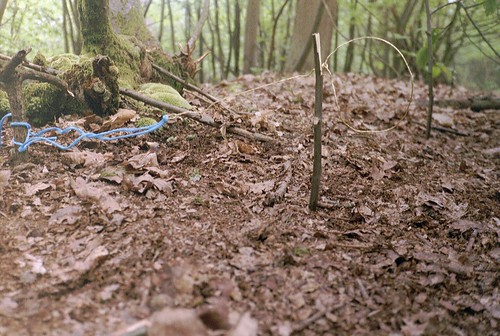
There is a talk on breaking camp. We tear down our shelters and disperse the wood we used to build them. Make sure the fire is out then disperse the ashes and cover the fire pit. If it is dry season make sure the ashes are cold, also make holes in the ground and pour water in them.
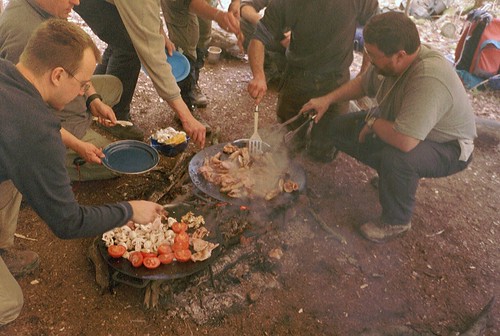
Gutting a fish: There is a demonstration on two big salmon. Cut from the butt to back of the head underneath the fish. Scoop out all the guts. Throw them away if you are unsure of the water quality. Cut the fins off. Cut the skin around head and tail. Put your hand between the skin and the bones and peel bones off. A perfect fish skeleton with the head and tail attached (like cats eat in cartoons) should come off.
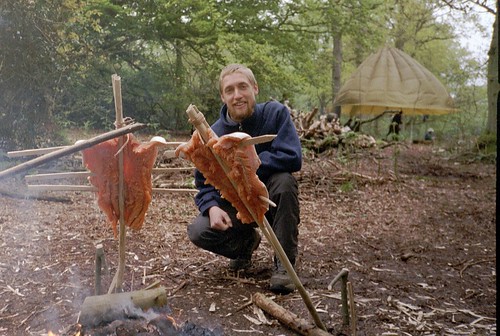
Cooking the fish: We are going to ‘panace’ the fish, Native American (First Nations) style. Split a long piece of Hazel almost all the way down the middle. Spear the salmon steak all the way through with two thin sticks to hold it flat. Sandwich the salmon between the split sections of the hazel. My notes don’t indicate this, but you probably have to bind the top of the split hazel back together. Cook above a fire until it looks tasty. The last 5 minutes of cooking but it skin side down onto the embers. This is truly delicious.
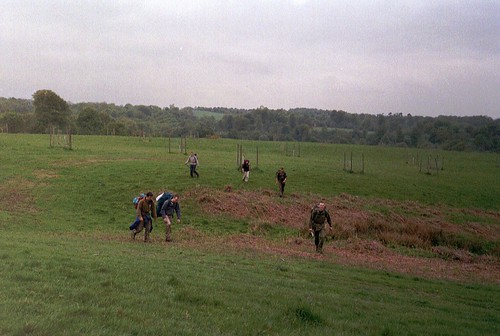
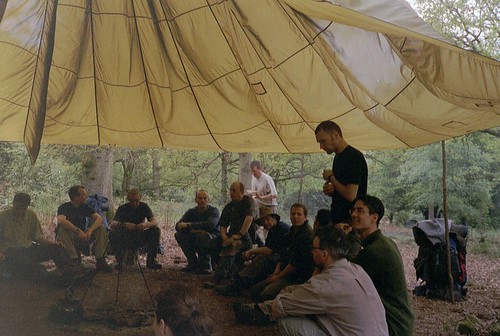
Navigation is next. Another lecture in the main area under the parachute. The United Kingdom is divided by the Ordnance Survey (government mapping company) into 100 km2 squares. Map references start with the two letters indicating which square to use. Our bushcraft camp is in the TQ square. Magnetic and map (grid) North usually differ slightly because the magnetic north moves. The map will often indicate the difference. In practice the difference is too small to make a difference when on foot, and when there are occasional landmarks to correct yourself by. Average walking speed over flat grass is 15 minutes to a kilometer.
We are given a map (1:25000) with all features except contour lines, forests, rivers and lakes removed. We are told where we are and where we have to get to. We split into two groups and head off. It’s a nice stroll, past lots of deer.
Once at destination we cover water: We need 1.5 to 5 liters a day in temperate European climate, depending on the temperate / season. Always carry clean water with you. Look for running water. If near a lake look for the stream that feeds it. Before purifying water you can pre-filter it to remove organic matter by pouring it through cotton (a sock or t-shirt).
Purify water through:
- Boiling it: Water must reach a rolling boil with big bubbles. It doesn’t need to stay like that long – once the rolling boil is achieved the water is clean.
- Chemical treatment: A pump with iodine in the tube, or iodine drops or tablets. The pump type is preferable as you only get the minimum amount of chemicals.
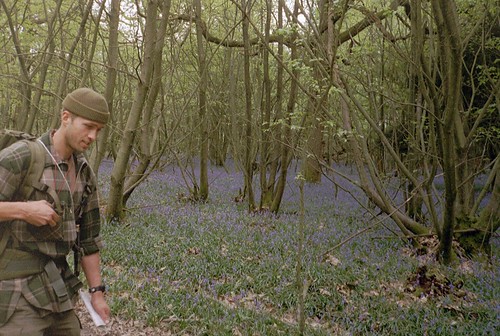
We wade into a very muddy lake (between Eridge Park and Forge Wood in the map linked on Day 1) to collect cattails. You can eat the base of the stem. Peal the outside layers off and eat the inside. It’s like eating a big leek, but softer.
The root is a rhizome which runs parallel to the ground from one plant to the next. We pull one out each. There is carbohydrate in there. Later on we will roast them in the fire. Put the whole root directly in the fire. When it is charred on the outside remove, peel, and eat the inner white bit. Be careful not to eat the outside.
When collecting cattails make sure not to confuse them with the poisonous Iris which grows near it – the Iris does not have the cotton flower, and has a regular root running up-down instead of a rhizome.
We head off and stroll through some woods. You can eat the young leaves of beach and hawthorn. I eat some – they taste of leaves. If you can spot it, Wood Sorrel is a tasty garnish. It is a small three leafed clover-like plant that grows in shaded wooded areas. Base of the stem is purple-reddish.
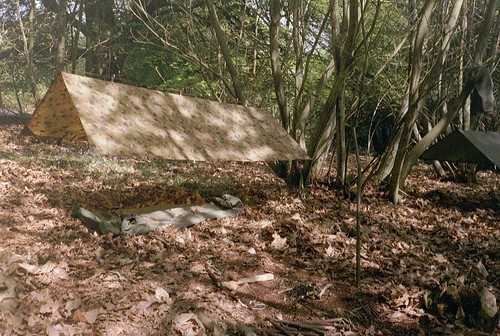
We head further into the woods and stop to setup camp. We bivouac using a basha (also known by it’s Australian name – hootchie) strung between two trees and pegged out (we carve pegs on the spot out of sticks). We will sleep under it in a bivvie bag (a gore tex waterproof sleeping bag cover). We are shown the knots to use to setup our basha. The two main instructors head back to base and we stay out with three assistants.
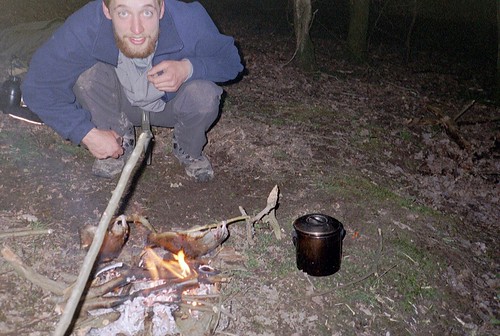
We make camp and collect water. We make fire with a Swedish firesteel and birch bark. Scrape and peel the bark to have paper-like hanging off the main bark. Spark onto those, and add more bark scrapings onto it. Once caught give it some more bark and very small twigs, ideally birch because of the oils it contains. We boil the water so we can drink it. We kebab a trout (provided already gutted) and cook some rice. I make some notes then turn in for the night.
Day 5
We wake up under our bashas. I go to the stream to collect water and boil it for cooking breakfast, hygiene, and drinking water for the day. After breakfast we are shown how to pack up our bashas. We make an effort to cover traces of our camp.
Sit by the lake – more bow drill practice. With two people it is possible to make fire with the bow drill. On your own it is very hard work.
Juha and Laurence show up to teach us about tracking. They take us back into the woods where we camped and show us signs you can use. Look for things that are out of place / unnatural. A charred stick, carved, with a fork in it, means someone cooked. Cut branches. Food remains. Unnatural birch bark curls. Our attempts to cover our tracks turn out to of been quite poor. We do a better job.
We stroll off. The birch polypore skin makes a good plaster. This is a whitish flat fungus which can grow to the size of a hand spread out.
The sweet chestnut inner bark strands we prepared earlier are dry and ready to weave. We are shown how to weave two or three (I don’t remember exactly) strands of bark together to make rope. I really enjoyed learning to make rope.
We meet a variety of plants:
- Thistle – shave the stalk (clear sap) and eat. Roast the root in the fire to eat.
- Lesser celandine which you can chew to numb mouth pain.
- Yarrow can help heal wounds.
- Flowering plants typically don’t have much root because they have used their energy to produce the flower. Try and catch plants before they flower for a good size root.
- The taproot of Burdock can be roasted and eaten. Dig it up in Autumn, Winter or very early spring. Unfortunately it grows mostly in very rocky ground, so digging out the root can be difficult.
It is possible to live on cat-tail roots and burdock roots, but you would lack nutrients long term.
Our walk through the woods takes us to a river. We talk about fishing. It’s a good option when living off the land. A spinning rod (normal fishing rod) helps a lot. Juha carries mono-filament fishing line (quite thick), shots for weight (you could use stones), and barbed hooks in different sizes. Use live bait – anything edible. Instead of bait you can use a lure. You can also catch fish by snagging them – throw a triple hook over the head of a fish you can see and pull the hook into it.
Stringing a net across the width of a river should catch lots of fish – the same can be done between trees to catch birds. Thorns or bits of wood bound together can be used as hooks. Attach a small thorn to a rope, feed that into a worm / insect. When the fish eats the worm pull hard to hook the inside of the fish.
The best times for fishing are usually early mornings or evenings, sometimes even night. Look for bubbles of fish breathing breaking the surface. Shaded areas overhung by trees, near rocks, or small islands in the stream, are all good places to cast.
We make a night line. This is a line which will be hung over the river, with lots of smaller weighted lines with hooks on them hanging off it deep into the water. The hooks would be baited.
The school doesn’t have a license to fish, so we can’t actually try the techniques out. A lot of them would be illegal anyway – we are talking about back-country fishing or survival situations.
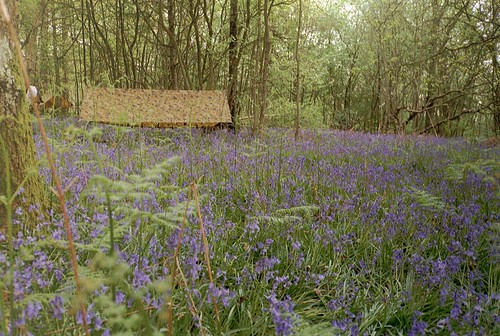
We head back into the woods, gaining height. We make camp in a beautiful area full of bluebells. Spend a very pleasant evening round our little campfire discussing bushcraft with a couple of the assistants. One of them is on secondment from the Dutch army’s mountain reconnaissance unit. The other loves the woods, and has done odd jobs all his life to be able to spend more time in them. Together they remind me of Beavis and Butthead.
Day 6
We pack and stroll back to base camp. On the way we are shown how to make a withy (essentially using a willow branch to make a strong thick rope). Not much time is allocated to this, and it’s a difficult technique. No-one in the party manages it, but we are impressed by how Juha makes a bow out of a willow branch.
We stop below a big pine tree. The needles, steeped in water, make a tea with lots of vitamin C and some sugar. Pretty much any pine tree’s needles will do. The very long thin roots which run out from pine or spruce parallel to the ground make good binding material. They can be used straight away. Better yet, scrape off the bark, dry, then soak before use. Split length ways trying to achieve two long sections. If the split runs towards one side bend the thick end more.
We will be making a fish hook. A thorn will be the spiky bit. It will be bound to a small carved piece of soft wood. The binding will be the pine root.
We are greeted back at base camp by all the ingredients to make a fried breakfast / brunch. Nice.
After eating we are given time to work on our projects. I make cord from the sweet chestnut bark. The group has gotten to know each other and gelled very well. Banter and jokes are exchanged. It’s quite a disparate group: A scout leader, a yorkshire bus driver, a tree surgeon, a forestry instructor, two mountain leaders, and several IT professionals. We help each other out in the bits we learned faster.
The Woodlore shop visits and they lay out their goods. I buy a Swedish firesteel. I browse the Fundamental Bushcraft book and resolve to buy it online when I get home.
Then it’s time to learn about trapping. We will snaring birds, or small mammals such as squirrels and rabbits. Our snares will Mangle, Tangle or Strangle.
The best place to lay snares are on the animal’s runs, not too close to their warrens. They would notice something different around their warrens straight away – best to wait till they are out running on the ‘motorway’ where they are not as aware of their surroundings. Look for droppings, flattened grass or the actual animals, to know where to lay the traps. Lay them late afternoon (before dusk), and check them each day at dawn and dusk, to prevent predators getting to your snared dinner.
First we learn a sprung bird trap. When the bird puts its foot in the rope it dislodges a carefully placed small branch, which releases a much stronger branch which grabs the birds leg and lifts it into the air – a nice piece of bushcraft engineering. We use the rope we have been making from the inner bark of sweet chestnut for this.
Two years after this bushcraft course, I was in the Ecuadorian Amazon jungle visiting an Achuar community, and they showed us a very similar trap. Possibly that is whom Ray Mears learnt it from. Or they both came up with it independently. Or Ray taught the Achuar (he does get around).
To trap squirrels we position a large fallen branch so as to create a shortcut between the ground and a tree branch. Apparently squirrels will usually take the shortest route to where they are trying to go. We put 7 to 10 simple steel wire loops at squirrel head height all the way up the branch.
Finally we do a rabbit trap. This is a larger loop of doubled over brass wire, fed through an eyelet using a small twig to keep it hanging at rabbit head height. The loop is tied to a rope or cord which is anchored to the ground with a strong peg. The whole trap is setup on a rabbit run. Try and locate where the front and back legs go and place it just in front of the front legs.
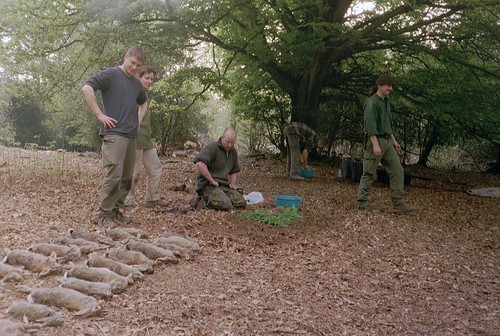
As about 15 people a week learn trapping on this estate, there would be nothing left if we got to actually practice. We take our traps down and head back up the hill to camp. The instructors have bought us each a freshly shot rabbit off a local farmer. We pretend we just snared it, and learn to gut it. As I have various cuts and scratches on my hands from the weeks knife work, I get to wear plastic gloves.
Squeeze out any remaining urine by pressing down along the belly. Cut the skin in the middle stomach (be careful not to cut into the actual stomach) and tear the skin off. Break the four feet off, cutting the tendons if needed. Pull up the stomach area, cut it open, and shake / pull the guts out. This is the smelly bit. If there are white nodules on the liver don’t eat the liver. Punch fingers through the diaphragm and pull the lungs and heart out. Push fingers in bum to clear, and cut off the tail. Pull the head off. You should now have a small fur bag – put the offal in there and bury it, or use it as fishing bait. Cut off the ‘skirt’ bits.
For those of us unused to country matters, this is gruesome. A strong streak of black humour pervades the group, and we get on with the task. To get the meat slice along the spinal cord either side and pull out the saddle meat. This is the main meat on a rabbit. Break / cut the legs off. There is more meat on the back leg, and a tiny bit on the front leg. We stick to the saddle meat.
The smell of fresh rabbit guts is not particularly strong, or particularly unpleasant, but it sure does stick around. Despite numerous scrubbings, I could still smell it on my hands days later.
The meat goes into a pot and we eat rabbit stew. The instructors tell us there will be a test tomorrow. I make bits for my fish hook, practice feather sticks, start some more rope, and go to bed. Sleeping outside in the spring, and waking up in the woods, is a wonderful experience. It gets cold at night so I sleep fully clothed. I sleep better and better each night.
Day 7 – Saturday
I rise early on this, the last day of the course. I bind my fish hook, prepare my rabbit snare, and pack. We shoulder our packs and head a short distance down the hill to do the test. It is:
- Put up basha and prepare sleeping area.
- Make fire with one match and feather sticks.
- Put that fire out, and make fire again with the bow drill.
- Boil a pot of water on that fire.
- Identify the 19 plants laid out by the instructors.
- Setup our snares.
- Lay out what we made this week: Spoon, fish hook, withy, night line.
I get everything setup and done very quickly, then struggle all morning with the bow drill. After several hours I’m out of breath, my arm aches, and my knuckles are bleeding from rubbing on the ground. I get lots of smoke, a big pile of black dust, but no ember. Juha lends me his set, which doesn’t help. Finally Juha helps out and we do a two man bow drill – very quickly, we have an ember. In a real situation, I hope I have a match, a lighter, or my swedish firesteel. Or a friend.
After the test we clear the site and head back up the hill to the main camp. We return all our kit, except the knife which is ours to keep.
A fellow course member shows me how to fold the basha / hoochie. It must be still setup. Fold and tie the guy ropes. Then accordion the sheet to get a rectangle. Untie the ropes and lay on the ground. Fold in half length ways. Fold in the guy ropes then fold up in small sections. Wrap the end of main rope round one way, and the other end round the other way. This makes a nice hoochie package.
The instructors all gather and hand out our certificates. Everyone passes, although some get a special mention. Clapping, handshakes, and photos.
Someone drops me back in Tunbridge Wells. It is a spring Sunday afternoon, the sun is shining, and the streets are busy with urbane, attractive shoppers. I feel shell-shocked, and very out of place. I sit on the train back to London, and make more rope from the inner bark of a sweet chestnut tree.
Conclusion
I learned a lot on that Woodlore course. They really packed it in, and now almost three years later I can still remember most of it. So the course works.
It was a good group, and most of the instructors were great. Juha was an inspiring wise man of the woods. Lawrence, the second lead instructor was, unfortunately, miserable. I think he is now the main instructor, so check before booking. Oh, and you’re not going to meet Ray Mears.
The style was too military for my taste. We were generally not told what was going to happen next, and the instructions were of the type: ‘Gather a branch of this shape and length from this species of tree. Go’. Only later would we discover what that branch was for. Part of the reason for this was to put us under stress to test our psychological aptitudes, bushcraft being as much about a calm and comfortable approach to nature as it is about skills. The rest of the reason is the instructors probably find that style cuts down on questions, and they want an easy life. I would of enjoyed it more and probably learned better had the instructors been more open with us.
Would I do it again ? Most definitely, although I would probably try and go with Woodsmoke, run by the previous lead instructor at the Woodlore school. One of their prior students, also on the Woodlore course, told me they had a less military approach to bushcraft.
Whoever you go with, you get to spend a week in the woods, and it’s hard to beat that.